Source: http://www.motherearthnews.com
The reel mower you bought from Walmart, after 3 months of use, now is not quite as reliable as before. The grass is pretty uneven, and you wonder why you did not better maintain your reel mower. Why is it?
Well, as you can see, occasional adjustments to the blades may prove more beneficial to you and your lawn overall than neglecting it.
And hence this small article for reel mower owners, as both a set of simple guidelines and a source for inspiration on some rainy days.
Step 1: Preparation
First of is always some easy preps before the real work. To do this DIY fixing, you should own a pair of heavy-work gloves, also a few basic tools and supplies, so make sure to pre-check them.
Start off by washing all residue from your mower, using your hose at some strong water pressure for best results. Make sure that nothing is left behind, or there will be some nuisance later on. Let the small guy dry, then pick up your screwdriver.
Using your tools, check for any loose bolts at the reel and wheels, then tighten them up. Replace some components if you have to. After that, you should take your mower to your workshop, on a strong and sturdy surface for further working. Be sure to have something between the reels so that they don’t rotate while you work on the blades.
Step 2: Blade sharpening
Apply cutting oil - some other soft abrasive may also do - on a sharpening stone. Check every cutting edges for honing. Then using the sharpening stone, make about seven strokes, as closely along the edge as possible. Be light, but very sure in each stroke. Then onto the next blade, and make as many strokes as you did last time.
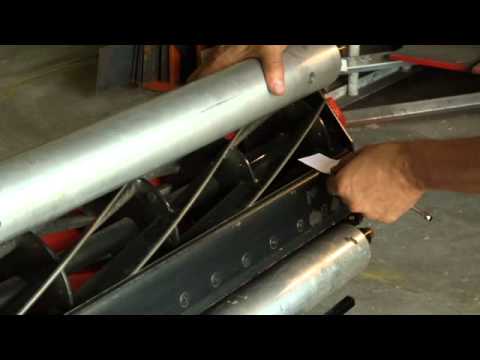
It is important that the blades are even, straight and sharp. You can check that by some easy steps. First, remove that obstacle you inserted beforehand. Then, use a piece of paper, then slowly slice the paper on the blades. Be extremely careful so as not to injure yourself. So long as the blades cut nicely, you can move on to the next step.
Step 3: Bed-knife/Reel adjustment
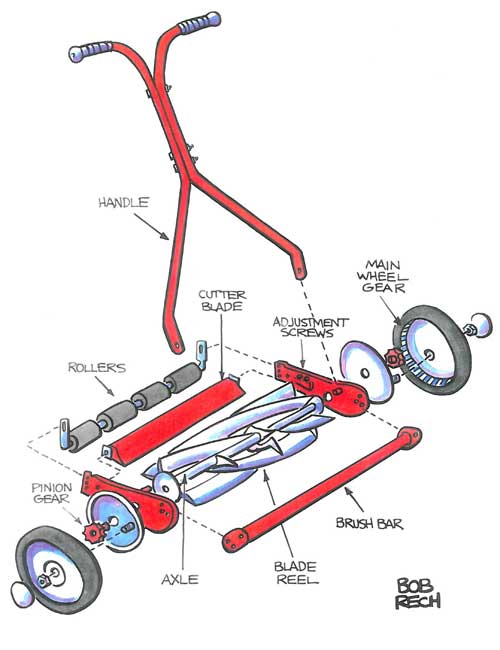
The distance between the bed-knife and the reel, albeit small, is still very essential to the final appearance of the lawn after mowing. If not properly adjusted, one small difference can lead to a whole backyard disaster, some sickened patches of grass of uneven cut passes.
Well, as you can see, occasional adjustments to the blades may prove more beneficial to you and your lawn overall than neglecting it.
And hence this small article for reel mower owners, as both a set of simple guidelines and a source for inspiration on some rainy days.
Step 1: Preparation
First of is always some easy preps before the real work. To do this DIY fixing, you should own a pair of heavy-work gloves, also a few basic tools and supplies, so make sure to pre-check them.
Start off by washing all residue from your mower, using your hose at some strong water pressure for best results. Make sure that nothing is left behind, or there will be some nuisance later on. Let the small guy dry, then pick up your screwdriver.
Using your tools, check for any loose bolts at the reel and wheels, then tighten them up. Replace some components if you have to. After that, you should take your mower to your workshop, on a strong and sturdy surface for further working. Be sure to have something between the reels so that they don’t rotate while you work on the blades.
Step 2: Blade sharpening
Apply cutting oil - some other soft abrasive may also do - on a sharpening stone. Check every cutting edges for honing. Then using the sharpening stone, make about seven strokes, as closely along the edge as possible. Be light, but very sure in each stroke. Then onto the next blade, and make as many strokes as you did last time.
It is important that the blades are even, straight and sharp. You can check that by some easy steps. First, remove that obstacle you inserted beforehand. Then, use a piece of paper, then slowly slice the paper on the blades. Be extremely careful so as not to injure yourself. So long as the blades cut nicely, you can move on to the next step.
Step 3: Bed-knife/Reel adjustment
The distance between the bed-knife and the reel, albeit small, is still very essential to the final appearance of the lawn after mowing. If not properly adjusted, one small difference can lead to a whole backyard disaster, some sickened patches of grass of uneven cut passes.
Reel adjustment
Once the blades are sharpened and checked, reinsert an obstacle to prevent the reel from rolling. Using screwdrivers, try to adjust the cutting bar gradually, and equally. If one side is a little further than the other, the cut will be uneven. You can turn the screw clockwise to bring the blades closer, or vice versa. Also, make sure that you turn with delicacy, only a little bit at a time, on both sides. Then put a paper on the bed, remove the obstacle, and roll the blade for testing. Keep repeating the process until the mower reaches satisfactory performance.
Step 4: Finalize
Now, you can lubricate the reel and the wheels for your next use. You may have to unscrew the cover for this, but it is very worth the effort. Using a small tip, apply oil or grease to contact points, then rotate slowly for the lubricant to go thoroughly. Then do the same thing on the other side as well. Remember to put the cover back on when you’re done.
After that, you should also do a test run to see your newly optimized mower in action. If you have catered to its every needs, then it should fire off very smoothly.
What is also very important is your next maintenance. Generally, after every third run, you should recheck everything for performance again. Usually, you should repeat this procedure once a month to keep your mower at best health and capabilities. Again, it is better to maintain a good mower, than to completely fix or replace it with a new one (again, pointing to the above chart).
Read more: click here.
 RSS Feed
